Railway at a Glance
Lot Size: ~80' x 120'
Scale: 1:24
Gauge: 3' 6" (45 mm)
Theme: narrow gauge shortline common
carrier
Era: 1920's - 1930's
Age of Railway: 3 years in current location
Motive Power: battery powered
Length of Mainline: ~430' currently
Maximum Gradient: basically flat
Minimum Radius: 8' on mainline, 6' on spurs
Type of Track: hand spiked code 250 aluminum
Structures: scratch built
Control System: radio controlled, battery powered
Concept
I am a model maker by passion. Much of my enjoyment in this hobby involves the construction of the various parts. I started model railroading over 35 years ago, as a member of the La Mesa model railroad club, which is currently constructing an HO model of the heavy mountain mainline through the Tehachapi mountains between Bakersfield and Mojave California. These two factors, the joy of building and inspiration from the prototype, affect everything I do.
My primary interest is switching and shortline operation. When
I shifted from indoor HO to outdoor large scale, I chose to model
a narrow gauge shortline like the Carson & Colorado, which
is the Southern Pacific narrow gauge that ran up the Owens Valley
in eastern California. I am inspired by other California narrow
gauge lines as well. I loosely model an era around the 1920's.
After looking at the scale/gauge issue, I decided to build
in 1:24 scale. It's simple to make conversions, and I'm not too
concerned with a rigid fantasy. I am modeling a caricature of
a prototype railroad, where a "correct feeling" is the
goal, rather than a faithful scale reproduction. If people ask,
I tell them that my railroad runs on 3'-6" gauge. While this
isn't too common in the US, it was the common British colonial
narrow gauge.
I used to live near Mendocino, California, where the Big River
comes out to the sea, so I chose that for my railroad name. I
like the play on the Rio Grande (Big River in Spanish). A friend
did the graphic for my logo, and Larry Larsen did my first dry
transfers. Since then I have had Rick Blanchard produce custom
decals for me.
As a result of fighting control panels and dirty track in HO,
I decided to go for battery power and radio control right from
the beginning. The price of aluminum rail was attractive, and
I didn't need to be concerned about rail corrosion, even in the
sea air environment where I lived. In 1987, I took my first step
into outdoor railroading with the purchase of 2 bundles of code
250 aluminum rail, a pound of spikes, and a pair of Bachmann Big
Haulers. Like most prototype narrow gauge railroads, I had large
fantasies and a small bankroll!
In 1995, my life changed, and I moved to San Diego. I disassembled my entire railroad, and salvaged all the parts. One of the benefits of this move has been the ability to participate in an active garden railway club. Sharing with others, and seeing how they have addressed common problems has been a wonderful experience.
Track
I am a woodworker, and have a table saw at my disposal, so I cut redwood ties. Track panels are built with Micro Engineering code 250 aluminum rail, and steel spikes, create 6' sections. Rail joiners are made from bent copper sheet. Some of these sections have been on the ground for over 10 years. The mainline uses an 8 foot minimum radius to create a more prototypical feel.
I created a track gauge by scaling off of an NMRA gauge. This is essential for building switches. I recently noticed that Old Pullman is marketing such a gauge. All the switches are a #5 frog, which works out to be tangent to an 8 foot radius.
Switches are thrown manually with a simple ground throw fabricate from 1/16" brass rod, brass tubing, and sheet copper.
One of the industrial spurs at Lynnwood has to cross the mainline, so I built a diamond crossing. One of the wonderful parts of this hobby is the acoustics. When metal wheels clack across a diamond crossing, it sounds great.
In my first layout, track was laid loose in a shallow ditch of crushed rock. The expansion of the rail caused everything to shift around too much, so I tried attaching concrete bricks to the track sections with Silicon adhesive, with mixed success. This time I tried an entirely new system. Redwood stakes are driven along the right of way, with the top of each stake set to create the proper gradient. A 1" x 2" redwood batten is screwed to the tops of these stakes. A joiner plate is used to connect the battens. Short segments are used in curves, and switches get additional bracing for the switch ties and ground throws. The track sections are brad nailed to the battens which provides a secure support for the track. At grade crossings, I used a pressure treated 2 x 4 to support a wheelbarrow load.
Ballast is a mix of sand, dirt, and Portland cement, brushed in place dry, and then wet down. Much of my railroad is shaded by trees, so there is a serious leaf and pine needle inundation. With the ballast cemented down, the track can be swept clean with a broom, without brushing away all the ballast.
Motive Power
After some track was laid, I turned my attention to motive power, and was immediately dissatisfied with the operation and appearance of the stock Big Hauler. It was completely rebuilt to create Big River #1. I wanted to operate my railroad like the prototype, and decided not to use a battery car. A Makita 9.6 volt nicad battery stick fits into the boiler, through the smoke box, which puts the weight over the drivers, where it's needed. The new motor is coreless and drives a Northwest Shortline gearbox. The electronics came from Remote Control Systems. All the details were changed to reflect the SP narrow gauge in eastern California.
A decision had to be made about couplers. I had used Kadee's in HO, and knew that they are solid and reliable. However, I have always wanted to "pull the pin" during switching operations, and Kadee's don't work that way. The only scale coupler with working knuckles is from Precision Scale, but they don't really operate very well. I figured out how to modify them, but it took time. After 6 pair, I decided to take a shortcut, made an RTV mold, and cast them in pewter. Now when I lift the cut lever, the knuckle opens.
I recently converted a batch of 6 more Big Haulers. This time the drive was from Barry's Big Train with 12 volt Pitmann motors. The speed controller is from Reed's, the sound from Sierra, and the tenders are rebuilt to be whale backs. Many commercial detail parts were used, as well as custom urethane castings. All 6 were inspired by specific SP and Pacific Coast engines. Two of these became Big River #2 and #3. The rest were for clients. If I had it to do over again, I would make sure I bought Barry's most recent drive design, which eliminates surging running down hill. The motor is mounted vertically, and an extra spur gear reduction shaft is included.
An advantage of radio control is the ability to run on any layout. However, dragging an entire train around got to be a pain. Most layouts are built with smaller radius curves and shorter passing sidings, so my equipment didn't always run very well. As a solution, I built a traveling train in the form of a gas motor car, Big River M1. This is an extensively modified Bachmann combine, powered by 2 Northwest Shortline Magic Carpet drives and radio controlled, and powered on a 12 volt gell cell. It will handle a 4 foot radius and fits in the shortest passing sidings. It also provided the Big River with another train and passenger revenue.
Rolling Stock
In the early 1900's most narrow gauge cars were wood. Almost all freight cars are variations on a flat car. In 1992, I built a run of 6 cars, based on SP designs. Three were left as flat cars, two have 2 board sides added to become low side gondolas, and one has a tank mounted on it.
Starting with a pine board, I modeled the SP combine caboose #467, for a tail end car. Details are kept minimal, with an accent on durability and minimum expense. All the cars have working cut levers for switching. I use metal wheel throughout, which seems to give enough weight for good tracking, and sound nice running over rail joints.
In 2000 I built a set of 6 new tank cars and 7 boxcars. I also took a Bachmann 4 wheel caboose and modified it for two trucks. This gave me a second tail end car.
See Constructing a Basic Freight Car
Structures
On my first layout, I built a simple yard on one side of my wood shop. The yard created an opportunity to build structures, primarily railroad service buildings. A redwood water tank was based on a tank on the California Western at Fort Bragg. The fuel oil bunker was inspired by the one at Laws, California, on the SP. The sand house is copied from one on the D&RGW.
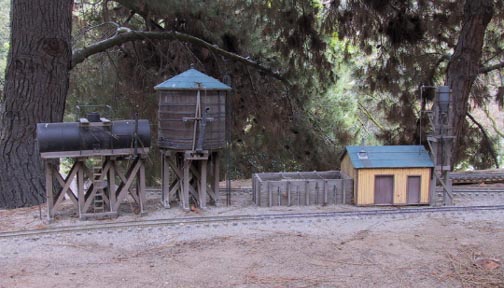
The turntable is inspired by the Carson & Colorado table at Laws, and is fully functional. Constructed entirely of heart redwood, with pewter castings, and bolted together with 256 0-80 nuts, it has been living outside for over 8 years now.
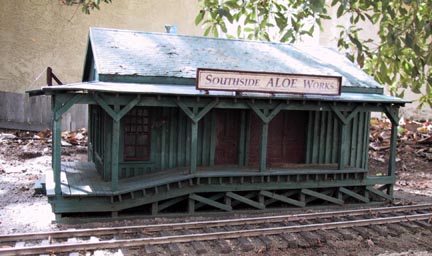
Over the years, I've added a few industries. Southside Aloe Works is a large board and batten warehouse with a covered loading dock.
Tecolote Fuel Oil is a corrugated sheet metal storage building with two raised bulk fuel tanks, built from Bachmann tank cars.

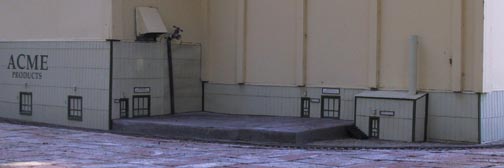
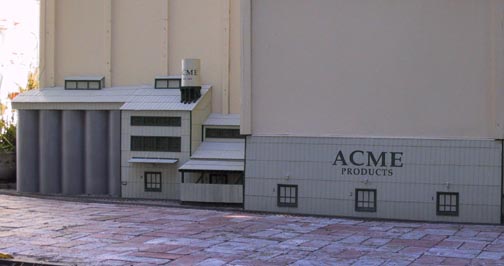
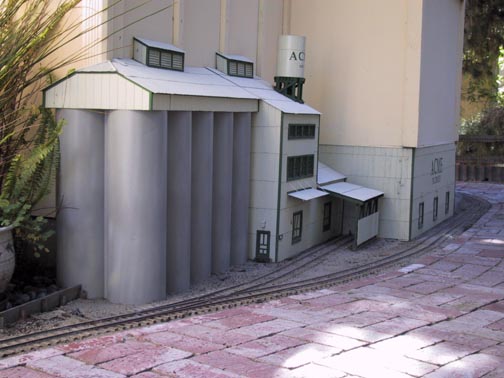
The most recent building is the massive Acme Products complex. This corrugated sheet metal building is over 15' long and almost 3' high at the peak. It is mostly a flat against the base of the house. A tempered masonite substructure is covered with Big River Lines corrugated galvanized sheet metal. The windows and doors are custom urethane castings. The silos are drain pipe. ACME produces a wide range of items and has 7 different loading areas for freight service of all kinds. Their motto is, "If we don't make it, you don't need it!"
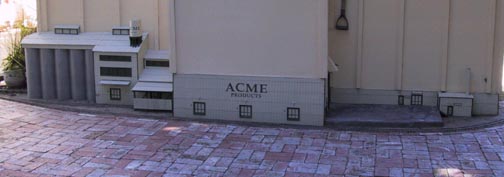
All the building live outside. None of them have interior details, although I am beginning to put lights on them.
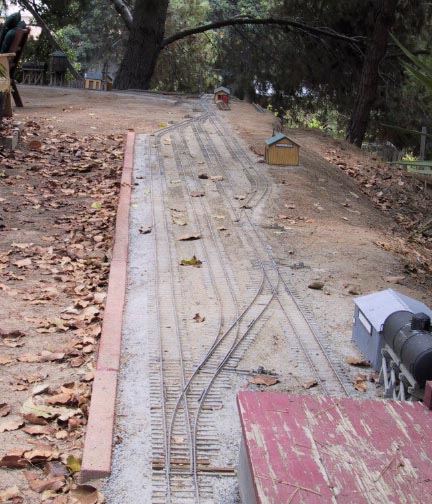
Track Plan
See Track Plan for the trackage as of December 2000.
My first layout, in Mendocino, was a yard and a loop around my shop. Starting over in a new location has been a wonderful opportunity to correct some things that didn't work very well, and a chance to expand my fantasy in new landscape options. This San Diego property is mostly flat, dropping off in the back 12' to a creek flood plain. Along the south side, the land drops from level with the front yard to the creek in the back.
Most of the garden railroads I have seen are designed as islands. They are viewed from the outside, with the track and scenery concentrated within, like table top railroads in HO. I prefer another style of track plan which is called "around the wall", or shelf design. Here the operator and viewer are on the inside, and the track is spread around the perimeter of the space. This type of plan allows the track and scenic arrangements to be more spread out.
I deliberately did not construct a continuous run, since operation point to point is more of interest to me. However, I have come to appreciate the social entertainment that comes from simply allowing a train to run, and plan to have track completely encircle the house eventually.
The construction is proceeding in three distinct phases. In 1997, phase one was finished, consisting of the main yard, a mainline out of town with a passing siding on the south side of the house, and a reverse loop in the front yard. This allowed plenty of operation and firmly established the railroad.
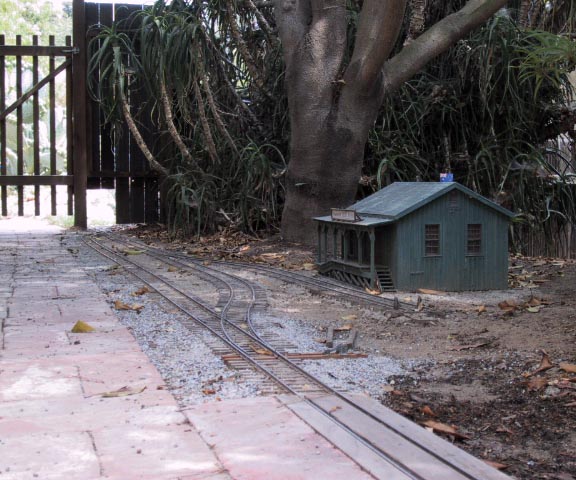
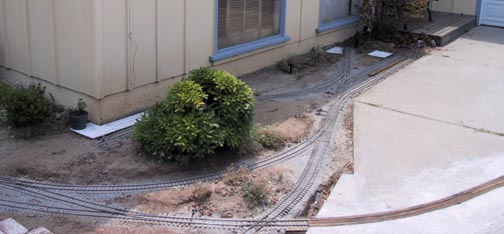
I started in the back with the yard, called Tecolote Creek (which runs behind our house). I looked through several of my narrow gauge history books, drew schematics of 7 or 8 yards, and then created a generic narrow gauge yard. The three long tracks are about 24' each. The engine services are in one corner, and there are several industries around the yard. A switch back serves the patio team track and Acme Products, the largest industry at Tecolote Creek. Another spur serves the compost pile. The long tail track in the yard serves the wood pile. There are plenty of opportunities for future building projects, specifically the depot and an expanded engine facility.
The south side of the house is shaded by a large Victorian Box tree and a huge Aloe plant, which create the feeling of a small room, separate from both the front and back yards. The passing siding here (Aloe siding) has a spur and an industry, Southside Aloe Works, which processes aloe.
One corner of the front yard has enough space to swing a reverse loop around Mount Curby. It is the most problematic section of track, since it's in full sun. A 6' length of aluminum rail expands about 1/16" when the temperature swings 50°, so there are a lot of sun kink problems here.
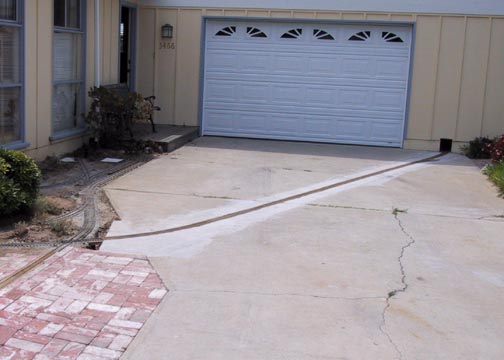
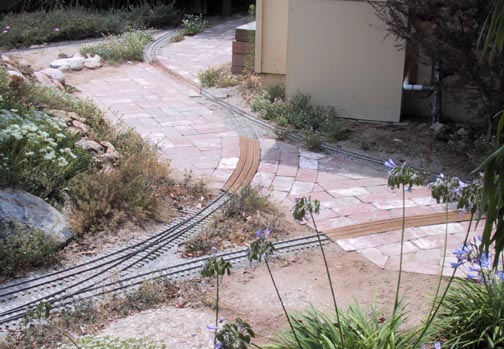
In 2000, phase two was constructed. It pushed tracks across the front yard and around to a small area beside the front door. This is the town of Lynnwood, which has a switching complex for four industries, and another passing siding at Lynnwood depot. From Lynnwood, the tracks run across the driveway and into the garage, where the equipment is stored.

A wye near Mount Curby is used for turning trains at Lynnwood.
The existing reverse loop was rebuilt with a tighter radius and a spring switch, and is used only for simple operation. The third leg of the wye extends downhill as a future mainline.
Phase three will be a continuation of the tracks around the house, with a fourth passing siding on the north side of the garage, and a connection back to Tecolote Creek for a complete circle.
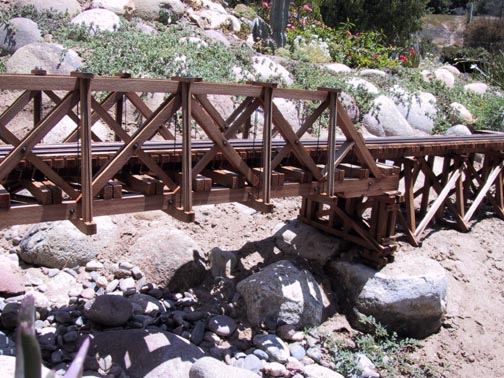
In the distant future, phase four will continue the mainline down the hill from the tail of the wye. This will drop at 3% - 4% along the hill on the south edge of the property, with three sidings and a large double switch back, ending in a port and mining district at the bottom of the hill in the backyard.
Garden
Currently, there is not much in the way of miniature planting, as I'm not much of a gardener. Eventually the area at Lynnwood will be planted in scale. This is near the front door, and will be a showcase area. Most of the back yard at Tecolote Creek is a bricked patio. The hillsides on the south and west are under large pine trees, which shed a constant rain of needles, precluding much else in the way of plants. The Big River lives as a miniature among giant plants.
Concluding Thoughts
While all of this seems ambitious, I am continually surprised by how much of my fantasy has already come to pass. It gives me hope. The visualizing and planning are part of the fun. There is something magical about simply seeing a piece of track out of the corner of my eye, or a small building under the edge of a bush, even if there are no trains running. I think that childlike magic is essential to understanding the attraction of this hobby.
Another aspect that I enjoy is watching what nature does to the models. All my buildings stay outside, only the rolling stock comes in. While I have built models for years, they have always been inside or under glass. These garden structures force me to confront a whole new modeling challenge, real weather. Drainage is a real issue, not a nice concept. I have had to learn about new adhesives and new materials in order to cope with sun and moisture. Raw wood is like slow film, it develops over time, turning a lovely gray with no effort on my part. Paint fades, insects inhabit the structures, and nature paints patterns that only an artist can add. The learning never ends. I like that.
This was written in 2003. I did finish the loop around the house, with a fourth passing siding along the north side of the house, as show on the track plan. However, the mainline down the hill never happened, as we retired and move out of San Diego in 2006.